Archivo de la categoría: 300

Cuestiones avanzadas

Auditing Data Changes


Sometimes, it is not only important to know when and who perform the last change but trace all the changes to the data in certain important tables.

Big applications, require security behaviors and traceability. And better more important, they must be maintained independently of the applications, since more than one application could modify the same database.

And here is where triggers come to rescue.

Of course, I am not saying you must implement business rules in triggers (or even in Stored Procedures).

Business rules are rules, not data manipulation, even when in some SPECIAL cases, you must implement some in database objects, but this is not the generic case. (We will discuss this in several other posts in the future).

How it works

To store any change, we need a COPY of the data each time it is about changed. So, we need another table with the same definition than the original. Moreover, it is good to store who and when the change was performed.

The stored procedure creates a new table, based in the source table definition, adding the following columns.

ColumnData TypeUsage
DateChangeddatetime2(7)When
UserChangednvarchar(150)Who
Actionnvarchar(15)How

The stored procedure receives an optional parameter for the destination schema. If it is provided, the table denomination will be the destination schema and the same table name than the original. If not, then the history table will be named like the source one, plus the “_Hist” suffix.

Once the table exists, the procedure must create Triggers for Insert, update and delete changes over the source table.

How the triggers work?

A trigger is a T-SQL code which is executed automatically when something happens with one or more rows in a table.
The code could be linked to one or more of the three major events: Insertion, update or deletion.
Meanwhile the trigger is running, a special table, called inserted, contains the new values in change, and another table, called delete, contains the old values. Notice that this tables could contains more than one row, in case the action that start the process, manipulates one or more rows, like in one massive update.
From the trigger point of view, there is no update, but a delete and insert combined.
So, inside the trigger, depending on the action, you can have one or both “virtual” tables, as follows.

Actioninserteddeleted
InsertX
UpdateXX
DeleteX

In this example, the trigger will store in the historical table a new entry with the row (or rows) are inserted. And entries with one or more deleted rows in updates or deletes, to persist the older version of the rows.

CREATE TRIGGER [dbo].[EmployeeTerritories_TInsert] 
	ON [dbo].[EmployeeTerritories]
	AFTER INSERT
AS
  BEGIN
    SET NOCOUNT ON;
	--Insert a new ow in historical table
    INSERT INTO [dbo].[EmployeeTerritories_Hist]
      (
       [EmployeeID]
     , [TerritoryID]
     , [DateChanged]
     , [UserChanged]
     , [Action]
      )
           SELECT 
              [O].[EmployeeID]
            , [O].[TerritoryID]
            , SYSUTCDATETIME()-- The exact moment of the insert
            , USER_NAME()-- The user performing the Insert
            , 'Insert'
           FROM 
              [inserted] [O];
  END;
CREATE TRIGGER [dbo].[EmployeeTerritories_TUD] 
	ON [dbo].[EmployeeTerritories]
	AFTER UPDATE, DELETE
AS
  BEGIN
    DECLARE 
       @Action NVARCHAR(15) = 'Update';
	   /*If there is no rows in inserted table,
	   then it is not an update*/
 
    IF NOT EXISTS
     (
       SELECT 
          *
       FROM 
          [inserted]
     )
      BEGIN
        SET @Action = 'Delete';
      END;
    SET NOCOUNT ON;
    INSERT INTO [dbo].[EmployeeTerritories_Hist]
      (
       [EmployeeID]
     , [TerritoryID]
     , [DateChanged]
     , [UserChanged]
     , [Action]
      )
           SELECT 
              [O].[EmployeeID]
            , [O].[TerritoryID]
            , SYSUTCDATETIME()
            , USER_NAME()
            , @Action
           FROM 
              [deleted] [O];
  END;

So, using the same methodology than in the SP Builder post, with a Table Type variable to collect the columns of the original table, the procedure builds the triggers’ scripts to create them with sp_executesql .

You can found the script fot the SP Create Triggers here.

HTH

Autenticación Azure y MVC


Donde explico como desarrollar e implementar MVC con autenticación en Dominio Azure.

Parte I. Creando el sitio Web

En Visual Studio 2013, hay asistentes que permiten integrar rápida y fácilmente los mecanismos de identificación centralizada provistos por Windows Azure y tus propias aplicaciones MVC.

Para comenzar es útil tener un dominio en una suscripción de Azure. (Obviamente, primero tener una suscripción… :). Hay de prueba, antes que te preocupes.Pero debes planificarlo bien, ya que duran poco http://azure.microsoft.com/es-es/pricing/free-trial/ ).

Entrando al administrador de la suscripción (https://manage.windowsazure.com), en la barra de opciones a la izquierda, selecciona Directorio Activo. Azure Active Directory
Allí podrás agregar un directorio que te permita administrar seguridad.

Al crear un proyecto nuevo, y seleccionar que el mismo será Web, existe la opción de cambiar la forma de identificación (Autenticación) de los usuarios.

Nuevo MVC con Autenticación Azure

Nota: lamentablemente, en ediciones anteriores de VS, era posible hacer esto DESPUÉS de haber comenzado el proyecto. En VS 2013, esa opción no aparece. 😦

Al cambiar la autenticación, permite seleccionar Autenticación de una organización, e indicar el dominio (el que creamos previamente)

Autenticación Organizacional

Esto deja elementos de configuración en el web.config de la aplicación, que configuran la relación entre el directorio de Azure y tu aplicación.

Además, agrega al proyecto, las clases necesarias para configurar dicha relación, establecer los objetos necesarios en la base de datos predeterminada del proyecto y controlar la adecuada identificación en cada parte del sitio (manejable por atributos) .

Por otra parte, establece configuraciones en Azure, que permiten la interrelación entre tu proyecto y el dominio de autenticación, como podemos ver en la imagen 3

App Web en Directorio Azure

Entre dichas configuraciones, quiero remarcar que la url de re direccionamiento post identificación, apunta a tu propio sitio como http://localhost:[puerto] para permitirte hacer todas las pruebas necesarias.

Pasar a producción

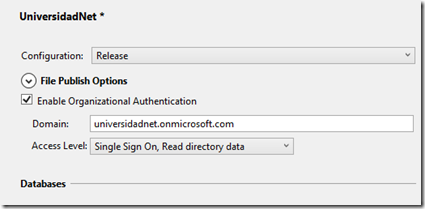
Cuando publicamos nuestro desarrollo a un sitio web Azure, el propio proceso de publicación también nos permite relacionar el sitio publicado con nuestro mecanismo de autenticación, por una casilla de selección específica.

App Web Publicación

Sin embargo, el sitio falla ya que intenta redirigir a “localhost” :).

Si investigamos un poco, vemos que se crean entradas para cada aplicación, bajo el “dominio”, y en este caso, hay dos, una para la versión local, y otra para la publicada.

App Web Publicada

Lo que necesitamos es… cambiar el archivo de configuración.

Mantener el orden.

Lo ideal es, siempre, tratar de automatizar estos cambios, de modo de no tener que “recordarlo” cada vez.

Dado que al publicar, se procesa el proyecto en modo “release”, aprovecharemos esa circunstancia para que automáticamente se modifique el archivo de configuración para ello.

En el web.config original, estas entradas definen la autenticación con Azure.

    <add 
      key="ida:FederationMetadataLocation" 
      value="https://login.windows.net/xyz.onmicrosoft.com/../FederationMetadata.xml" />
    <add 
      key="ida:Realm" 
      value="https://UniversidadNet.onmicrosoft.com/UniversidadNet" />
    <add 
      key="ida:AudienceUri" 
      value="https://UniversidadNet.onmicrosoft.com/UniversidadNet" />
    <add 
      key="ida:ClientID" 
      value="z1y3x6ey-y891-991a-a316-36631836x1yx" />
    <add 
      key="ida:Password" 
      value="aA\A1YA8VN5AY80PAqvvcA\l868Yieoz\vfVsFHAs\U=" />

Entonces, editando el archivo web.release.config, podemos hacer que las mismas cambien por los valores correspondientes para la versión “publicada”.

En el Explorador de Soluciones, hacemos clic en el botón “ver todos los archivos”, VS Ver Todos los archivos   veremos que hay 2 archivos que extienden el web.config, entre ellos, el web.release.config que necesitamos editar.

App Web Configs

Si vamos a la suscripción Azure, específicamente a la aplicación recién generada dentro del Directorio, podremos obtener los valores para el sitio público, en la opción de configuración.

Por cierto, vas a tener que generarte una clave para poder copiarla, ya que la autogenerada queda oculta.

Con esos datos, agregamos entradas en el web.release.config, agregándole los modificadores

xdt:Transform="SetAttributes" xdt:Locator="Match(name)"

para que reemplacen esos valores en la compilación para publicación (release),  de la siguiente forma:

    <add
      key="ida:FederationMetadataLocation"
      value="https://login.windows.net/xyz.onmicrosoft.com/../FederationMetadata.xml"
      xdt:Transform="SetAttributes" xdt:Locator="Match(name)"
      />
    <add
      key="ida:ClientID"
      value="NUEVOIDy-y891-991a-a316-36631836x1yx"
      xdt:Transform="SetAttributes" xdt:Locator="Match(name)"
    />
    <add
      key="ida:Password"
      value="aA_A1YA8VN5AY80PAqvvcA_l868Yieoz_vfVsFHAs_U="
      xdt:Transform="SetAttributes" xdt:Locator="Match(name)"
    />
  • ida:FederationMetadataLocation
  • ida:ClientID
  • ida:Password

Solo los tres valores mostrados son necesarios, colocándoles los atributos correspondientes a la aplicación de producción

Lo mismo valdrá para cualquier configuración que utilicemos (un ejemplo típico es la cadena de conexión a la base de datos, que aparece como ejemplo en el web.release.config).

Por cierto, Gise @0GiS0 ), está publicando otras cuestiones relacionadas con Aplicaciones en Azure, como por ejemplo, crear una máquina virtual para tu sitio Web, desde Visual Studio.  http://www.returngis.net/2014/04/integracion-de-visual-studio-con-microsoft-azure-virtual-machines/