Para la interactividad, será necesario definir algunas propiedades, en el modelo de la página WPF, pero como dependientes (DependencyProperty)
public Boolean ShowDBs
{
get { return (Boolean)GetValue(ShowDBsProperty); }
set { SetValue(ShowDBsProperty, value); }
}
// Using a DependencyProperty as the backing store for ShowDBs. This enables animation, styling, binding, etc...publicstaticreadonly DependencyProperty ShowDBsProperty =
DependencyProperty.Register("ShowDBs", typeof(Boolean), typeof(dlgConnectionModel), new PropertyMetadata(false));
De igual forma, para poder habilitar el botón Aceptar cuando la conexión sea correcta, etc.
A su vez, el componente lanza un evento cuando, por cambio en el tipo de autenticación, requiere (o no), credenciales.
Este evento, atrapado en el modelo, permitirá a su vez, habilitar o deshabilitar los controles de usuario y contraseña.
Finalmente, al igual que en el diálogo para WinForms, el constructor de la ventana se establece como internal, para que sólo la clase que retorna la cadena de conexión pueda crear una nueva instancia.
Desde una aplicación WPF entonces, se podrá solicitar una cadena de conexión, a través de
La cadena de conexión de SQL Server, varía según la ubicación (local, remota o en la nube) del servidor, así como, según el método de autenticación del usuario. Éste último, ha tenido varios agregados al integrarse con el Directorio Activo y su extensión en la nube, incluyendo Microsoft Entra.
Es interesante que la biblioteca Microsoft.Data.SqlClient expone una clase, SqlConnectionStringBuilder, que nos permite generar la cadena de conexión pasándole los parámetros requeridos.
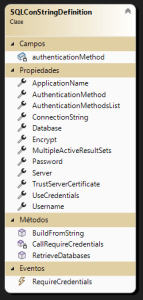
En este ejemplo, les muestro una clase, definida en una biblioteca de clases, que permite generar cadenas de conexión, encapsulando la funcionalidad
SqlConnStringDefinition
Como se ve, expone como propiedades, los distintos elementos necesarios u opcionales, requeridos para definir una cadena de conexión.
A su vez, la propiedad ConnectionString genera la misma, al retornarla, según este código:
publicstring ConnectionString
{
get
{
SqlAuthenticationMethod method= (SqlAuthenticationMethod)Enum.Parse(typeof(SqlAuthenticationMethod), AuthenticationMethod);
SqlConnectionStringBuilder sqlConnectionStringBuilder=new SqlConnectionStringBuilder();
sqlConnectionStringBuilder.DataSource = Server;
sqlConnectionStringBuilder.InitialCatalog = Database ??"master";
sqlConnectionStringBuilder.Authentication = method;
sqlConnectionStringBuilder.MultipleActiveResultSets = MultipleActiveResultSets;
sqlConnectionStringBuilder.Encrypt = Encrypt;
sqlConnectionStringBuilder.TrustServerCertificate = TrustServerCertificate;
sqlConnectionStringBuilder.ApplicationName = ApplicationName ??"No name";
switch(method)
{
case SqlAuthenticationMethod.ActiveDirectoryIntegrated:
sqlConnectionStringBuilder.IntegratedSecurity =true;
break;
case SqlAuthenticationMethod.ActiveDirectoryInteractive:
break;
case SqlAuthenticationMethod.ActiveDirectoryPassword:
case SqlAuthenticationMethod.SqlPassword:
sqlConnectionStringBuilder.UserID = Username;
sqlConnectionStringBuilder.Password = Password;
break;
case SqlAuthenticationMethod.ActiveDirectoryServicePrincipal:
case SqlAuthenticationMethod.ActiveDirectoryDeviceCodeFlow:
case SqlAuthenticationMethod.ActiveDirectoryManagedIdentity:
case SqlAuthenticationMethod.ActiveDirectoryMSI:
case SqlAuthenticationMethod.ActiveDirectoryDefault:
case SqlAuthenticationMethod.NotSpecified:
break;
default:
break;
}
return sqlConnectionStringBuilder.ToString();
}
}
El proceso inverso, esto es obtener un objeto SqlConnectionStringBuilder a partir de una cadena de conexión, lo realiza el método BuildFromString
Finalmente, la clase expone un evento, RequireCredentials, que se lanza cuando cambia la condición de requerir (o no), usuario y contraseña.
Ese evento se lanza al cambiar el valor de la propiedad AuthenticationMethod
publicstring AuthenticationMethod
{
get=> authenticationMethod; set
{
authenticationMethod = value;
SqlAuthenticationMethod method= (SqlAuthenticationMethod)Enum.Parse(typeof(SqlAuthenticationMethod), AuthenticationMethod);
switch(method)
{
case SqlAuthenticationMethod.ActiveDirectoryPassword:
case SqlAuthenticationMethod.SqlPassword:
CallRequireCredentials(true);
break;
case SqlAuthenticationMethod.ActiveDirectoryIntegrated:
case SqlAuthenticationMethod.ActiveDirectoryInteractive:
case SqlAuthenticationMethod.ActiveDirectoryServicePrincipal:
case SqlAuthenticationMethod.ActiveDirectoryDeviceCodeFlow:
case SqlAuthenticationMethod.ActiveDirectoryManagedIdentity:
case SqlAuthenticationMethod.ActiveDirectoryMSI:
case SqlAuthenticationMethod.ActiveDirectoryDefault:
case SqlAuthenticationMethod.NotSpecified:
CallRequireCredentials(false);
break;
default:
CallRequireCredentials(false);
break;
}
}
}
Nota: La idea de tenerlo como una clase en una biblioteca de clases, es para poder utilizarlo desde distintos clientes (Windows Forms, WPF, UWP, etc.)
Cosa que haremos en próximas entregas 🙂
De paso, mis deseos de un próspero y venturoso 2024 para todos.
Se ha hecho una buena costumbre por parte de Microsoft, establecer un resumen de las novedades que comunican en cada evento. Ahora, además, en distintos idiomas.
During this post, I explained how to get information from a database in JSON format. In this one, I will show you how to store information sent to the database in JSON format.
I will use a very common scenario, storing a master-detail combination. For this, I use the Order-Order Details tables in Northwind database, which you can get here.
The goal is to store a new Order, with several Order Details in the same procedure, by using T-SQL OPENJSON.
Like a cooking recipe, I will explain this step by step.
Define the JSON schema.
We want to store the information received in the Order Details table, so its schema will be the schema received in the JSON information.
Simply get the Order Details schema and remove the NOT NULL modifiers. This will be used in the WITH modifier of the OPENJSON statement this way:
It must have parameters to receive all the data for the Orders Table’s columns, and one more containing the entire JSON information for the Order Details table. Notice the OrderID parameter is declared as OUTPUT, so the calling code could retrieve the new Order ID for the inserted row.
For this, the procedure must use the IDENT_CURRENT function.
SET@OrderID=IDENT_CURRENT('[Orders]');
Insert the Order Details using OPENJSON.
In this case, using Insert – select statement, and OPENJSON from the Details parameter as source, declaring it with the previously obtained schema. Notice the utilization of the @OrderID parameter for the Order Id value in each row.
INSERTINTO[Order Details]([OrderID],[ProductID],[UnitPrice],[Quantity],[Discount])SELECT@OrderID/* Using the new Order ID*/,[Productid],[UnitPrice],[Quantity],[Discount]FROMOPENJSON(@Details)WITH([OrderID][INT],[ProductID][INT],[UnitPrice][MONEY],[Quantity][SMALLINT],[Discount][REAL]);
The C# code.
Define the Order and Order Details entities in your Application.
I created a simple C# Console Application Sample. In it, the Order and Order_Details has been defined by using the Paste Special Paste JSON as Classes feature in Visual Studio. You can see the step by step here.
The Insert routine in the main program.
The code creates a new instance of the Order class, with values,
Orderorder=new(){CustomerID="ALFKI",EmployeeID=1,OrderDate=DateTime.UtcNow,RequiredDate=DateTime.UtcNow.AddDays(5),ShipAddress="Obere Str. 57",ShipCity="Berlin",Freight=12.05F,ShipCountry="Germany",ShipName="Alfreds Futterkiste",ShipPostalCode="12209",ShipRegion=null,ShipVia=1};
Then get information from a previously defined set, (as JSON), to have an array of Order Details.
// Create the details. To Avoid a long code, just get it from a JSON samplevardetails=System.Text.Json.JsonSerializer.Deserialize<OrderDetail[]>(InsertUsingJSONSample.Properties.Resources.Details);
Create the Connection and Command objects.
A connection object to the database is assigned to a Command object, with the name of the stored procedure as text, which is defined as a Stored Procedure command type.
By using this method, you reduce the calls between your app and the database server, optimizing the response, and including the entire store process in a unique implicit transaction.
In our current globalized world, at this time, any web site must be multilingual, enabling the user to select the language to use.
Moreover, a global company needs to know from which country the user connected.
A lot of sites, more of the streaming services as examples, identifies the country based on the IP address. Which could be a mistake, since a lot of people are in a different country of which belongs to.
Anyway, your database must need a language list and a countries list.
This post shows you a sample application which, using the standardized languages and countries from .Net Framework, and adding some information from external sources, set up some tables to manage this in your databases.
System.Globalization Namespace
The tool uses information from the System.Globalization namespace, which appears with .Net Framework from it very beginning.
Indicates if it is just a language or a language and country specification
Finally, I get information from two external sources. I got the GPS coordinates of each country from here meanwhile the flag’s pictures are from here. You can found the urls inside the code as well.
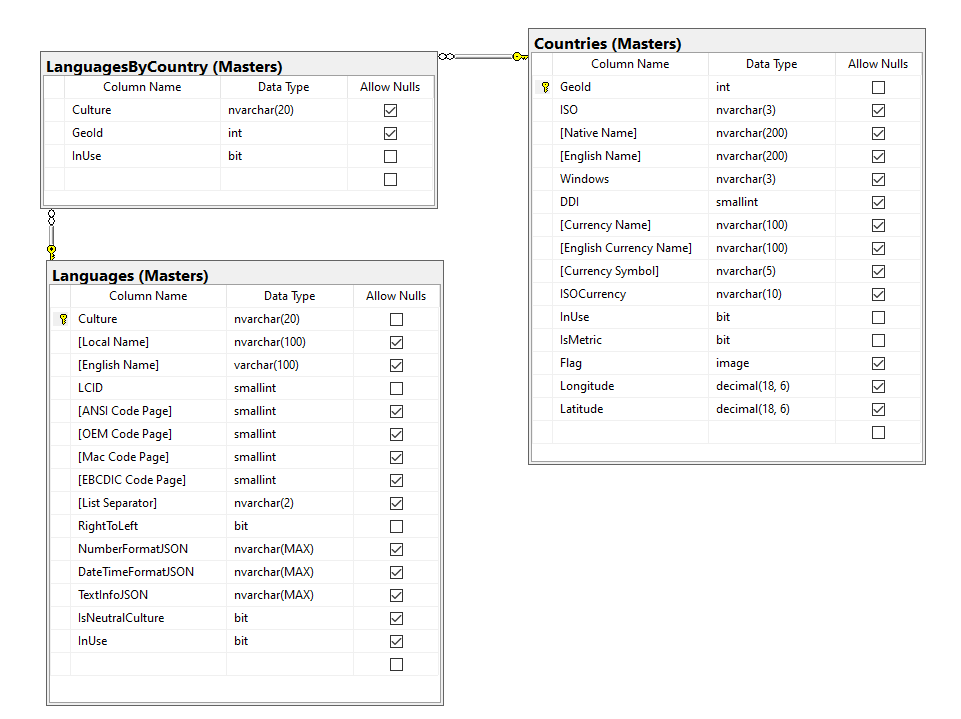
Storage’s schema.
Languages/Countries database schema
The tool create 3 tables as you can see in the Diagram.
It is necessary this way, because some countries use more than one language, and the relationship must be preserved.
The tables have a InUse column, to enable/disable each row for your application. So, you can query the Languages table for all the rows with the InUse value in 1, to display only those languages you desire use, or have enabled.
Note: It is important using nvarchar/nchar data types, since several Native names are in UTF-8 chars.
Using the tool.
The tool expects at least the connection string to your database. It accepts a second parameter for the schema name under the tables will be created. If this value is not provided, the tool assumes “Masters” as schema name.
In any case, the DDL scripts manage the creation of the schema if it does not exist.
The source code of the DataGen solution is in my GitHub.
If you prefer just use a T-SQL script to add the tables, here is the script.
In future posts, I will show some faqncy methods for site AND CONTENT localization.
Sometimes, it is not only important to know when and who perform the last change but trace all the changes to the data in certain important tables.
Big applications, require security behaviors and traceability. And better more important, they must be maintained independently of the applications, since more than one application could modify the same database.
And here is where triggers come to rescue.
Of course, I am not saying you must implement business rules in triggers (or even in Stored Procedures).
Business rules are rules, not data manipulation, even when in some SPECIALcases, you must implement some in database objects, but this is not the generic case. (We will discuss this in several other posts in the future).
How it works
To store any change, we need a COPY of the data each time it is about changed. So, we need another table with the same definition than the original. Moreover, it is good to store who and when the change was performed.
The stored procedure creates a new table, based in the source table definition, adding the following columns.
Column
Data Type
Usage
DateChanged
datetime2(7)
When
UserChanged
nvarchar(150)
Who
Action
nvarchar(15)
How
The stored procedure receives an optional parameter for the destination schema. If it is provided, the table denomination will be the destination schema and the same table name than the original. If not, then the history table will be named like the source one, plus the “_Hist” suffix.
Once the table exists, the procedure must create Triggers for Insert, update and delete changes over the source table.
How the triggers work?
A trigger is a T-SQL code which is executed automatically when something happens with one or more rows in a table. The code could be linked to one or more of the three major events: Insertion, update or deletion. Meanwhile the trigger is running, a special table, called inserted, contains the new values in change, and another table, called delete, contains the old values. Notice that this tables could contains more than one row, in case the action that start the process, manipulates one or more rows, like in one massive update. From the trigger point of view, there is no update, but a delete and insert combined. So, inside the trigger, depending on the action, you can have one or both “virtual” tables, as follows.
Action
inserted
deleted
Insert
X
Update
X
X
Delete
X
In this example, the trigger will store in the historical table a new entry with the row (or rows) are inserted. And entries with one or more deleted rows in updates or deletes, to persist the older version of the rows.
CREATETRIGGER [dbo].[EmployeeTerritories_TInsert]
ON [dbo].[EmployeeTerritories]
AFTERINSERTASBEGINSETNOCOUNTON;--Insert a new ow in historical tableINSERTINTO [dbo].[EmployeeTerritories_Hist]
(
[EmployeeID]
, [TerritoryID]
, [DateChanged]
, [UserChanged]
, [Action]
)SELECT
[O].[EmployeeID]
, [O].[TerritoryID]
,SYSUTCDATETIME()-- The exact moment of the insert,USER_NAME()-- The user performing the Insert,'Insert'FROM
[inserted] [O];END;
CREATETRIGGER [dbo].[EmployeeTerritories_TUD]
ON [dbo].[EmployeeTerritories]
AFTERUPDATE,DELETEASBEGINDECLARE
@Action NVARCHAR(15)='Update';/*If there is no rows in inserted table, then it is not an update*/IFNOTEXISTS(SELECT*FROM
[inserted]
)BEGINSET @Action ='Delete';END;SETNOCOUNTON;INSERTINTO [dbo].[EmployeeTerritories_Hist]
(
[EmployeeID]
, [TerritoryID]
, [DateChanged]
, [UserChanged]
, [Action]
)SELECT
[O].[EmployeeID]
, [O].[TerritoryID]
,SYSUTCDATETIME(),USER_NAME(), @Action
FROM
[deleted] [O];END;
So, using the same methodology than in the SP Builder post, with a Table Type variable to collect the columns of the original table, the procedure builds the triggers’ scripts to create them with sp_executesql .
You can found the script fot the SP Create Triggershere.
Segunda época del rockblog "Atascado en los 70". VIEJAS canciones y artistas PASADOS DE MODA. Tratamos al lector de usted y escribimos "rocanrol" y "roquero" con ortografía castellana.